
Applique with Me
Needle Under
Perfect Points
Freezer Paper or English Paper Piecing
Basting with Starch
Applique or Hidden Stitch
Stems
Circles
Pieced Leaves
Needle Under
This type of applique is done without benefit of paper or pre-basting the edges. It is called needle-under because it is done by turning under the edges to a marked line with the side of the needle, fingernail or toothpick.
 Marking the motif fabric:
The markings must be on the right side of the fabric, so always use a .05 pencil with soft lead or a water-soluble pen. On dark fabrics mark with a white or silver pencil. A fine tip white pen made by Clover should be available at your quilt shop. You can also use a white china marker, which is waxy. It should be available at stationery stores. Sharpen the tip with an eyebrow pencil sharpener.

Basting the motif:
- Baste the motif to the base fabric 1/4″ in from the markings.
- If it is larger than 3″, it is also a good idea to baste across the center in both directions.
- Make sure the motif fabric lays smoothly against the background.
- If it is well basted, it becomes one with the background fabric.
Stitching the motif:
 Turn the seam allowance under, so the marked line will not show, holding it in place with the thumb and forefinger. Use the Applique or Hidden Stitch.
- Do not start stitching at a point or indentation. Come up through the fold.
- The seam allowance is turned under as you stitch, swept under the motif with the side of the needle or toothpick.
- When you are finished stitching around the motif, remove the basting stitches.
Top of page.
The Stitch
- The applique or hidden stitch is used with all fabric preparation techniques.
- Preparation of the motifs (petals, leaves, stems, flower centers, etc.) for either technique is required before starting to stitch.
- Pull the thread off the side of the spool, so the spool turns. Pulling the thread off the end of the spool twists the thread. Thread the needle with the end that comes off the spool. Do not double the thread. Cut the thread at about 15″ (38cm). Longer threads twist and tangle as you stitch.
- Knot the single cut end.

- Bring the needle through the back of the base fabric and through the fold of the motif. Pull the thread through.
- Place the point of the needle below the place where the thread comes out and slightly under the edge of the fold. (arrow)
- Go through the base fabric less than 1/8″. Come back up through the edge of the fold with the point of the needle. This is accomplished with a slight rocking motion of the hand.
- Pull the thread through, until it is taut. Pull enough so the stitch is buried in the fold, but not enough to pucker the motif fabric. This is the first stitch.

- NOTE: The stitches show in the illustration to indicate that they are straight. On the back of the base fabric, the stitches will be at a slight angle parallel to the edge of the motif. Your actual stitches should not show along the folded edge of the motif, if they do, they should appear as tiny dots just at the fold. Use matching thread to minimize the stitches as much as possible.
Top of page.
 Perfect Points
This technique is used with either the Needle-Under or the Freezer Paper Techniques.
- Do not miter the points, this creates too much bulk at the point, especially on a narrow leaf. Trim straight across the point, leaving 1/8″ seam allowance, from the point or line.
- Trim, leaving 1/8″ seam allowance on both sides of the point.
- The seam allowance is turned under as you stitch with the Applique or Hidden Stitch. At the point
 take an extra tiny stitch. This emphasizes the point. With the side of the needle or a dampened toothpick, sweep seam allowance under the point of the motif.
 - Continue stitching.
Top of page.
Freezer Paper or English Paper Piecing
- Freezer paper is usually available in the supermarket, in the same aisle as plastic wrap and aluminum foil. Some quilt shops carry one with a grid.
- The paper has a thin plastic backing that melts when ironed, sticking to the fabric. Cutting motifs from it and ironing to the fabric gives support to the fabric and creates a tiny edge, making it easier to applique.
- If Freezer Paper is unavailable, bond or letter paper can be used instead.
- When using plain paper the technique is called English Paper Piecing. Cut the motifs from the plain paper, baste it to the wrong side of the fabric motif, to prevent slippage. Continue with the steps below for the Freezer Paper.
Cutting the motif:
- Trace motifs onto the paper side of the freezer paper. If the motif is directional, for instance, a letter, reverse it, so it is backward before tracing.
 For repeat motifs, fold the paper slightly larger than the motif, no more than eight layers; depending on the sharpness of the scissors. Trace one on the top layer. Staple the layers together inside the motif. Cut all layers at once. If the motif is directional, cut the paper roughly to the desired size, then stack the pieces paper side up. Staple.
- Iron the slick side of the freezer paper to the wrong side of the fabric. Leave at least a 1/2″ between the motifs to allow adequate seam allowance around each piece. The edge of the freezer paper is the stitching line. Leave at least a 1/4″ seam allowance around the edge of the paper when cutting the fabric.
Preparing the Motif with Basting:
 Hold the motif with paper face up. Snip indentations or inner points “V’s” in the fabric to the edge of the paper. Turn the seam allowance over the edge of the paper and baste.
- Along the curves smooth the fabric over the edge of the paper to avoid little bumps. Use the point of the needle or your fingernail to pull the fabric over the edge of the paper to smooth these out.
- Inner curves or concave edges have to be clipped, so they will lay over the paper smoothly. Do not clip all the way to the edge of the paper. Make several clips along the edge of the fabric, just enough so that the fabric will lay over the edge of the paper.
- If there are long unwieldy points when you are making a leaf that is narrow, trim the end of it 1/8″ from the point of the paper. Trim the seam allowance, leaving 1/8″ seam allowance about 1″ from the point on both sides.
- At the indentations or “V” where there is no fabric at the bottom of the “V”, just baste through the paper and continue on.
- At the point of a motif, continue basting the seam allowance to the edge of the fabric, stop with the thread on the fabric side.

- Fold the seam allowance over, bring the needle through the seam allowance. Continue basting down the other side. There will be some fabric sticking out to the side of the point, that is how it should look.
Stitching the Basted Freezer Paper Motif:
- Thread baste the motifs in place.
- Do not start stitching at a point or “V”.
- Start at an area that is as straight as possible. Using the Applique Stitch, stitch around the motif, stopping about 3/4″ from the first stitch.
 Do not end or cut the thread. Put the needle to the side. Remove all basting stitches from the motif.
- Slip tweezers between the paper and the motif fabric, so that the paper can be removed. Pull out the paper with the tweezers.
Top of page.
Freezer Paper and Basting with Starch
The advantages of basting with starch are as follows:
- Seam allowances are not thread basted, they are brushed with starch and ironed.
- Paper is removed before appliqueing. Seam allowances hold over time.
- All the motifs can be prepared and basted to the background before starting to applique.
- Use spray starch that comes in a can, the thick bottled variety is just too thick and even when thinned will leave globs of dried starch. There is also a clear liquid starch available, “Mary Ellen’s Best Press,” that I have been using and like it even better than the spray starch.
The first three steps below, 1-3, use Freezer Paper. Or use heat resistant Templar material for the motifs and set the iron at wool temperature. Follow the steps for using the starch, but iron the edges of the dampened fabric over the edge of the Templar®. This saves time by not cutting individual paper templates.
- Motifs must be cut from a double layer of paper.
- Cut two sheets of freezer paper. Lay one on top of the other, so the shiny side of the top one is on the paper side of the second one.
- Iron the two sheets, shiny side down, so they stick together, the bottom sheet will stick to the ironing board. Peel the paper off the ironing board. The two sheets do not need to be completely adhered to each other, as they are ironed to the fabric, they will have completely adhered.
- Follow the first three steps up to basting, for Freezer Paper or English Paper Piecing to prepare the motif.
- Spray a small amount of spray into a cup or bottle, then with a small brush or cotton swab daub the starch on the seam allowances.
- If you are right-handed (RH), press around the motif counterclockwise. If you are left-handed (LH), press around the motif in a clockwise manner and the little points will stick out to the left. (Looking at the motif from the right side, the
 points face to the left, for RH and to the right for the LH.
 - Fold 1: With the side of the iron, starting at a straight edge, not a point or “V”, press the seam allowance over the edge of the template. Hold the iron for a few seconds, to dry the starch.
- Fold 2: Gradually work around the motif. Give the motif a final press.
- Allow the motif to cool/dry, then pull the paper or plastic out, the seam allowance edge is firm and the prepared motif is ready to baste in place.
Top of page.
Three Different Stem Techniques
- There are different ways to make stems, but the first one is the easiest.
- There is a limit on how narrow the stem can be made, because of the four layers of fabric that end up in the stem. The sizes of the straight cut strip and bias strip are indicated in the pattern.
- When drawing the sewing line for a stem, draw only the concave line, when possible. If it is an undulating line, pick one! It is usually indicated in the pattern.
- Parallel lines are not needed and it is difficult to draw two perfectly parallel lines. If it is drawn incorrectly, it is hard to cover, then it has to be erased, which may be difficult. You will find with my sewing technique, the one line is enough for a guide.
- Since most stems have curves, the stem fabric must be cut on the bias.
Stem #1
 Since most stems have curves, the stem fabric must be cut on the bias.
- #a–From the stem fabric, cut the indicated size bias strip across the widest part of the fabric. Lay the 45° line on the ruler along one edge of the fabric, to cut off one corner.
- #b–Now move the ruler over to cut the needed size strip. Cut as many bias strips as indicated in the pattern.
- Fold the strips in half, lengthwise, wrong sides together. Press, avoid distorting the fabric.
- #c–Align the fold of the stem fabric with the marked line. Basting the stem in place is preferable to pinning, especially if it is more than a couple inches.
- Applique the fold, with matching thread, using the Applique or Hidden Stitch, following the traced line.
- #d–On the opposite side, tuck under the raw edges, appliqueing the new fold in place. The ends of the strips are usually hidden under the motifs. If you tuck in the raw edges, so they touch the previously stitched fold, the stem should be even in width.
Stem #2
This technique works best for long vines that need to be joined with bias seams and are basted in place, but not appliqued immediately because other parts are tucked underneath.
 Join bias strips. When bias is cut, both ends have 45° angles. See #b in drawing above.
- Layer the raw ends face to face, so there is about 1/4″ overlap on both sides. The “v” should be 1/4″ from the raw edge. Sew from “v” to “v”.
- Press seam allowances open, to reduce bulk.
- Fold bias strips in half, wrong sides together and raw edges matching.

- Machine stitch 1/8″ seam from the raw edges, the length of the stem fabric. Do not stretch as you are sewing, allow the feed dogs to do the work.
- Applique the fold along the traced line. Fold under the seam so it is hidden and applique the new fold.
Stem #3
This method makes turned tubes from bias strips: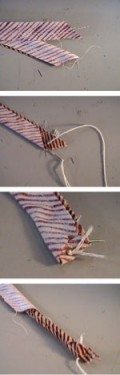
- Cut bias strips as you would for the technique above, cutting strips the size called for in the block instructions.
- Fold the strips in half, lengthwise, right sides together. With a short stitch, on the sewing machine, sew a scant 1/4″ seam from the raw edges.
- Turn the tube right side out with a turning tool or follow the remaining instructions using a length of kitchen string or yarn (longer than the tube) and a blunt darning needle (#18).
- Thread the needle with the string. Make a large knot at the other end. Poke the needle through the pointed seam allowance and push the needle through the tube.
- Pull on the string, first poking the seam allowance and knot into the tube.
- Ease the tube into itself as you pull. Hold that end gently, allowing the fabric to slide into itself. Once it is started, it usually slides easily.
- Finger press the tube, so the seam is on the bottom. Pressing with the iron seems to stretch the bias. Trim off the pointed ends of the tube.
- Align the turned tube with the traced line. Applique the folds, with matching thread, using the Applique or Hidden Stitch.
- NOTE: This technique works best with shorter lengths of stems when both ends are covered by motifs. Joining bias strips makes it difficult to turn the tubes where the seams meet and might cause uneven areas on the finished stem.
Top of page.
Circles
There are two ways to make a circular shape in the fabric. The easiest is to cut a circle from fabric. If you have made fabric “yo-yo’s”, it is the same technique. The first technique works for very small circles for berries or tiny flower centers, that do not need to be perfectly round. The second method makes perfectly smooth round circles.
Circles #1
- Make a knot in a single thread. With this thread sew a running stitch 1/8″ or so from the edge around the circle.
- Draw up the thread, tightly. Take a stitch through the gathers. The thread is not removed. Flatten the fabric puff.
- Place the stitches face down and applique the folds. Pull out any points with the tip of the needle. Try to keep the shape roughly circular.
 Circles #2

To see another way to make cutting circles from cardboard and plastic very easily see my tutorial about using paper punches
- Cut a circle template from heat resistant plastic or an index card.
- Cut a circle of fabric at least 1/2″ larger than the template.
- Make a knot in a single thread. With this thread sew a running stitch 1/8″ or so from the edge around the fabric circle. Stitch passed the knot a couple of stitches, avoid catching the other stitches. Place the circle template in the center of the fabric circle. Draw up the thread, so the edges of fabric gather over the circle template tightly, but gently.
- Press the gathered fabric with a hot iron for a few seconds. The fold should hold well enough to remove the template, gather the stitches again. Press. The thread does not need to be removed.
- Applique the fold with the Applique or Hidden Stitch. If there are any small points, push them under the circle with the tip of the needle.
For more permanent folds try the starch method. Dampening the gathers with spray starch or sizing, folds hold indefinitely:
- Spray a small amount into a bowl or cup.
- Dip a small brush or Q-tip into the liquid.
- Daub the liquid lightly, on the gathers.
- Press with an iron to dry.
- Cut gathering thread, no need to remove.
- Remove template.
Top of page.
Pieced Leaves
This is a simple way to make two-toned leaves, with a vein down the middle. The edges of the leaf can also be indented, as it does not affect the center seam.
 Measure the width of each half of the leaf. Add at least 1/2″ seam allowance. The leaf does not need to be the same size on both sides.
- Cut a bias strip the width needed for each side. Straight strips can be used, but the bias is more giving on the curved edges of the leaves.
- Sew the bias strips lengthwise with a 1/4″ seam, do not stretch while sewing.
- Press seam allowances open.
- For Freezer Paper Applique, align leaf template points with the seam allowance on the wrong side. Treat as any other applique motif.
Top of page.

Attachment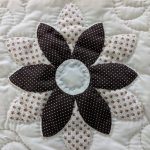
Would you know what this pattern is called? Thanks.
Very pretty! I am guessing. Perhaps double daisy? So many quilt patterns have multiple names. Are you looking to make the pattern? It looks pretty simple, the petals repeated and a circle.