-
Analyze Quilt Blocks Part 1
- Posted on August 3, 2013
- by bdieges
- in Blog
- No Comments.
Have you looked at different quilt blocks and wondered how they were put together? Have you thought about all the ones you want to make? Will it take a lifetime? Or maybe two?
In Part 1 of the Tutorial here are some ways to:
- look at 4-Patch blocks
- look at 9-Patch blocks
- learn about resizing blocks
Then in the remaining tutorials we will learn how to:
- look at 5 and 7 patch blocks in Part 2 of the Tutorial
- learn how to use your calculator to Rotary Cut strips and patches in Part 3 of the Tutorial
- learn about non grid based blocks such as the Lemoyne star and how to break them down using the calculator in Part 4 of the Tutorial.
If you have looked at quilt blocks and saved pictures from magazines, then you are ahead, but here are some more resources for quilt blocks. Here are a few books that you may find at the public library or even your own private one, if you are a bookaholic like me.
Of course, there are hundreds of other books out there that have traditional quilt blocks in them, but most are about making quilts from the blocks. My purpose is to have you look at a block and make it from scratch, yourself. That was how my first quilt class was conducted. We were not given a pattern we were taught how the blocks were constructed and how to decipher the code.
The books on this list are dealing with the blocks themselves, that I have enjoyed paging through. These are older books, that may be out of print, but more than likely are available through your library, yes a place that you go to borrow a real book!
- Beyer, Jinny. Patchwork Patterns. McLean, Virginia EPM Publications, Inc. 1979.
- Brackman, Barbara, Compiler. Encyclopedia of Pieced Quilt Patterns. Paducah, KY American Quilter’s Society. 1993.
- Hall, Carrie A. and Rose G. Kretsinger. The Romance of the Patchwork Quilt. Caldwell, Idaho The Caxton Printers, Ltd. 1980.
- McKim, Ruby. 101 Patchwork Patterns. Independence, Missouri McKim Studios. 1938. Reprinted by Dover Publications, Inc. 1962.
- Rehmel, Judy. The Quilt I. D. Book. New York, New York Prentice Hall Press, Inc. 1986.
- Computer quilting programs, such as Quilt Pro and Electric Quilt.
Different Type of Blocks
Let’s talk about the different types or categories of traditional blocks, if you looked at any of the books on the list, you saw that each author has a different way of categorizing the blocks and each way makes sense.
I find that I mentally divide each of the blocks into a certain number of divisions and that is how I categorize them. You are free to do it your way or follow the direction of one of the authors. Then break down each division into its components, almost all quilt blocks use these three components:
- Half Square Triangles
- One patch squares
- Four patches or nine patches
Clay’s Choice could be considered a 16-patch block, because there are actually 4 patches in both directions, but because it can neatly divided into two parts in both directions it can also be considered a Four Patch block. So that is how I look at it.
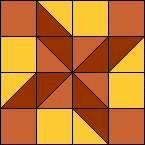
Clay’s Choice We often think there is one one official name for blocks and that everyone is using that name. Many blocks are known by different names. It goes back to when the block was first designed and what was going on at that point in time. Some blocks have names that refer to the lifestyle of the quilter and others are named after historical or political events, such as Clay’s Choice or Clay’s Star. This block has five other names.
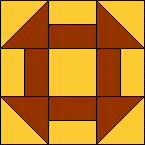
Hole in the Barn Door Looking through Barbara Brackman’s book, there are some blocks that have as many as twenty different names. The following block is one I have always called Hole in the Barn Door, but she lists nineteen others as well. Then there are all the variations. This block is definitely a Nine Patch, because it is equally divided 3×3=9. When I didn’t know better I called it a “Three Patch,” because I was going by the three divisions along one side.
Some blocks change names just because the dark and light fabrics are used in a different patch. There are blocks that have the same name, but are totally different. So, if I use a name of a block that you know by another name, just remember we are both right!
The majority of grid based blocks fit into the Four-Patch and Nine-Patch categories. So why am I showing you a One Patch, because it can be used to make an entire quilt. How many quilts have you seen that are just made from Squares or Half Square Triangles (HST). I have made some of those myself, those are One Patch quilts. That is the simplest quilt to make. Using lots of scraps in various prints, colors and shades your quilt will be wonderful. Or color coordinate the patches and that would be great too.

One Patch ——— Four Patch ——— Nine Patch Four-Patch blocks are divided evenly by a horizontal and vertical line. Each of the four sections are frequently identical and/or mirror images of each other.
Nine-Patch blocks are evenly divided by two horizontal and vertical lines into nine equal squares or squares and rectangles. Frequently the corner squares or center side squares are the same or mirror images.
Any quilt block can be made any size, as long as you work within the parameters of the category. If possible, stay with even sizes that are divisible by number of divisions in the grid. Fractions such as 1/2″, 1/4″ or 1/8″ are not a problem, just stay away from 1/3″ or 1/5″ or other fractions not available on your rotary ruler.
Nine Patch Block
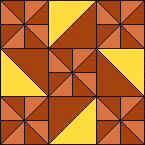 This Nine Patch Block is made with Four Patches and One Patches. The corner and center blocks are made from Pinwheels. Each Pinwheel is made from FOUR Half Square Triangles. The side and center blocks are each made from ONE Half Square Triangle. So how do you know how large is each patch?
If this is a 12″ block, divide it by 3. So that means each individual part is a 4″ finished block. That means the Pinwheels are made up of 2″ finished Half Square Triangles.
Underground Railroad or Jacob’s Ladder
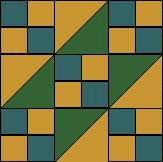 Another simple arrangement of Four Patches and half Square Triangles. This Nine Patch has at least five variations and 18 names. When assembling the parts, you will want to square up the Four Patches and the HST to the same size before sewing. For a 12″ block, each section is 4″ finished, so that means that the squares in the Four Patches are 2″ finished.
Are you starting to understand how it works?
Rosebud
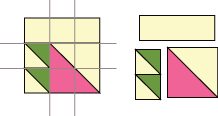
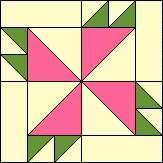 There are several different ways to look at this block. The simplest is to treat it as a Four Patch. Isolate one of the four divisions, dividing in three in both directions.
If you want a 12″ block, the four main divisions will each finish to 6″.
6″ ÷ 3 = 2″. This tells us that the smallest unit in the Nine Patch will finish to 2″. That would be the small Half Square Triangles (HST). It also means the rectangle will finish to 2″ wide X 6″ long. That makes the large HST a 4″ square finished.
2 X 2 = 4 (the finished size of the large HST)
What if you wanted to make this a 9″ block?
That means that one division or one fourth of the block would finish to be 4-1/2″ square. Since we are now working with a Nine Patch, divide 4-1/2″ ÷ 3 = 1 1/2″. So those small HST will finish at 1-1/2″ with the rectangle therefore being 1-1/2″ x 4-1/2″. Since the large HST is twice the size of the small ones it will finish at 3″.
Blooming Flower
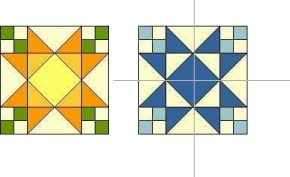
This Four Patch is one that I could not find in the book, so I named it myself. This is how blocks end up with many different names! I wanted to combine three different techniques: Square on Point, Four Patches and Flying Geese. Fabric colors/shades and where you use them will change the look of the block. In theory you could use TWO Half Square Triangles in place of each Flying Geese and replace the Square on Point with FOUR Half square Triangles. However, whenever seams can be eliminated, eliminate them! Makes for a cleaner look to the block.
Hope that is ‘nuf said! Talk to you next time about Five-Patch and Seven-Patch Blocks. If you have questions about something I did not cover and comments about analyzing quilt blocks, I would love to hear from you.
Related posts:
Tags: Four-Patch, Nine-Patch, quilt block books, quilt blocks, tutorial
If you enjoyed this article please consider sharing it!

