
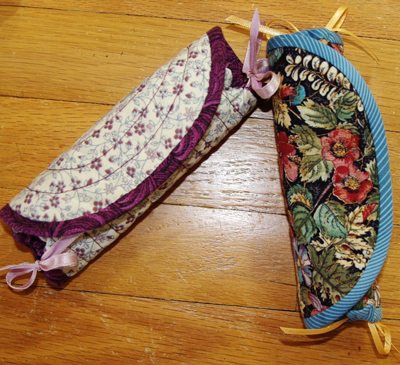
Thread and Needle Roll
Please read through directions before starting!
- 6″x9″ rectangle pre-quilted fabric or 7″x10″ (doesn’t need to be exact) rectangles each:
- Outer fabric
- Lining
- Batting, wool if possible, helps preserve needles.
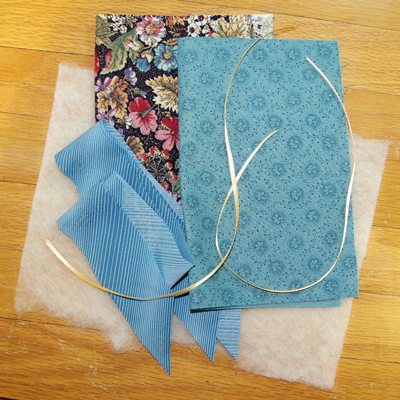
- 1 yard of 1-3⁄4″ bias strip, coordinating with the outer/lining fabrics
- 3/4 yard or so, 1⁄8″ coordinating satin ribbon, cut in half for two equal pieces
- (1/4″ can be used but take care when stitching the binding.)
- 3/4″ square VELCRO®
- If using pre-quilted fabric, skip this step. Layer lining, batting, and outer fabric. Safety pin layers together. Hand or machine quilt the quilt sandwich.

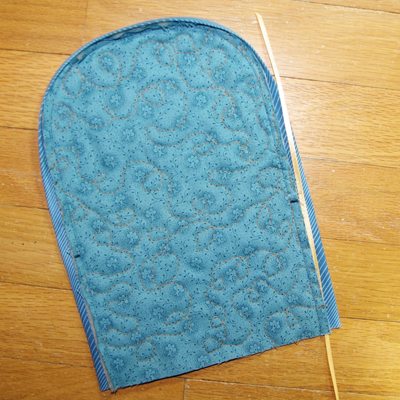
- Trim the piece to measure 6″x9″. Using a discarded CD, aligned with the edges, and rotary cut both top corners. Or trace around a cup on both corners and cut with scissors.

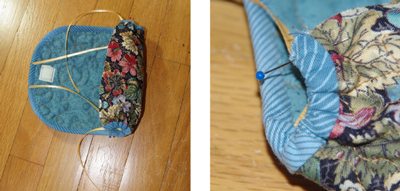
- Fold binding in half lengthwise, wrong sides together. Press the fold. Align with the raw edges of the binding with the fabric sandwich, on the outer side, starting at a corner.
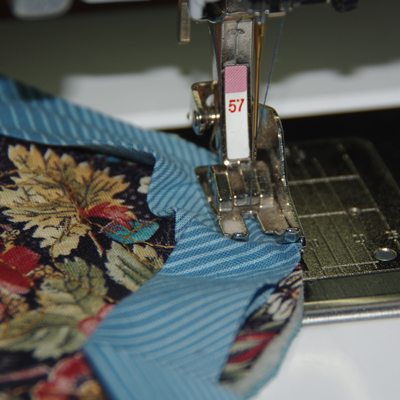
- Sew in place with a 1/4″ seam allowance ease around the curves. Snip the seam allowance at the curves every 1/4″, just be careful not to cut the seam. Trim excess binding.

- Before stitching the fold of the binding in place, mark 3-1/2″ up from the bottom straight edge on both sides. Slip ribbon under the 3-1/2″ portion of the binding. Leave a 6″ tail at the top. Pin through the ribbon at the mark, but be sure the remaining ribbon stays loose in the fold of the binding.
- Fold binding to the inside over the ribbon. Pin or clip binding. Hand or machine stitch the fold. With hand stitching, you are less likely to catch the loose ribbon. Stop and start with a backstitch. Sew across the ribbon, take a couple of stitches through it and finish sewing binding, avoid catching the ribbon, except at the 3-1/2″ marks.

- On the inside, center and sew the top edge of the VELCRO® soft side 1/2″ from the top. Center and sew the top edge of the VELCRO® loop 3-1/2″ from the bottom on the outside.
- Pull tightly on the bottom end of the ribbon to gather the lower portion of the roll. Stitch across the ribbon, so that it stays gathered, repeat on the other side.
- Align raw edges of the binding with the straight edge on the outside, holding ribbon out. Machine stitch 1/4″ from the edge. Hand or machine stitch the fold in place. Tie ribbon ends in a double knot and then form bows. Make the loops and ends the length you want them and then take a stitch or two through the knot to secure the bow.

- When spools are in place, secure the front edge of the roll to inside back cover with two small safety pins.
- Pass the thread through safety pins. Slip 6-8 needles on needle threader. Insert thread through the wire. Pull through the needles. Repeat for more needles. Secure needles on inside cover. Thread should slip through all the needles, winding off the spool.

- Take one needle, pull the thread. Cut the length needed. Knot. This thread and needle roll holds two large spools of Mettler® Quilting Thread.
OR
At least seven bobbins!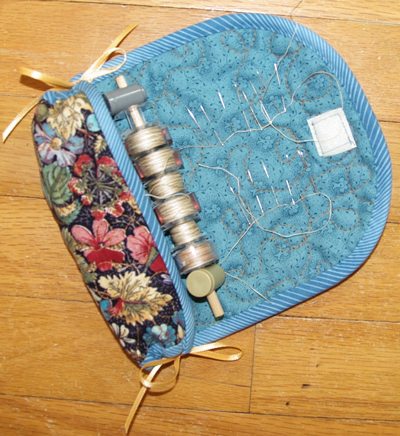
I am quilting the 2015 Block of the Month quilt with YLI machine quilting thread that comes on a 2000 yard spool. Since I prefer the convenience of my thread roll, I filled six bobbins. Then cut a skewer, 5-1/2″ long, to hold them in place in the roll. To keep the bobbins on the skewer I used two cord locks or cinches, the skewer just fit in the hole. Or you could also use ponytail holders or rubber bands on both ends.
To keep the unused bobbins from tangling, I put homemade bobbin thread holders on them. Or thread all of them, if you prefer.
